Bỏ qua nội dung chính

Làm cách nào để xuất tất cả hình ảnh cùng một lúc từ Excel?

Giả sử bạn có nhiều ảnh trong sổ làm việc của mình và muốn lưu chúng vào một thư mục cụ thể cùng một lúc, thông thường, bạn có thể sao chép và dán từng ảnh theo cách thủ công để lưu, nhưng việc sao chép và dán chúng rất mất thời gian. lặp đi lặp lại như thế này. Sau đây, tôi sẽ giới thiệu cho bạn một số mẹo để giải quyết công việc này.


Xuất tất cả các hình ảnh cùng một lúc từ Excel với chức năng Save As

Với Excel tích hợp sẵn Save As , bạn có thể lưu một sổ làm việc dưới dạng Trang web để lưu tất cả ảnh bao gồm biểu đồ, hình dạng và các đối tượng khác trong một thư mục. Hãy làm như sau.

1. Mở sổ làm việc có ảnh bạn muốn lưu. Nhấp chuột Tập tin > Save As > Duyệt qua.

2. bên trong Save As hộp thoại, bạn cần:

2.1) Chọn một thư mục để lưu các hình ảnh đã xuất;
2.2) Chọn Trang web từ danh sách thả xuống Lưu dưới dạng;
2.3) Nhấp vào Lưu .

3. Trong cửa sổ bật lên Microsoft Excel hộp thoại, nhấp vào .

4. Mở thư mục lưu các tệp đã xuất và bạn có thể thấy một thư mục và tệp định dạng HTML được liệt kê bên trong. Tất cả ảnh trong sổ làm việc bao gồm biểu đồ, hình dạng hoặc đối tượng được lưu trong thư mục này.

5. Bạn có thể giữ ảnh bạn cần trong thư mục và xóa những ảnh khác mà bạn không cần


Dễ dàng xuất tất cả các hình ảnh cùng một lúc từ Excel Với một công cụ tuyệt vời

Phương pháp trên sẽ trích xuất tất cả các đối tượng từ sổ làm việc, có thể, một số đối tượng trong số đó bạn không cần. Nếu bạn có Kutools cho Excel được cài đặt trong Excel, Xuất đồ họa tính năng này có thể giúp bạn chỉ lưu những hình ảnh bạn cần.

Sau khi cài đặt Kutools cho Excel, vui lòng làm như sau:

1. nhấp chuột Kutools Plus > Nhập khẩu xuất khẩu > Xuất đồ họa:

2. bên trong Xuất đồ họa hộp thoại, vui lòng cấu hình như sau:

2.1) Chọn Những bức ảnh từ Các loại danh sách thả xuống;
Lời khuyên: Theo mặc định, tất cả đồ họa bao gồm biểu đồ, hình ảnh và hình dạng trong sổ làm việc hiện tại đều được liệt kê.
2.2) Trong Lưu thư mục phần, nhấp vào nút để chọn một thư mục để lưu ảnh đã xuất của bạn;
2.3) Trong Định dạng xuất danh sách thả xuống, chọn loại hình ảnh bạn muốn xuất dưới dạng;
2.4) Nhấp OK.

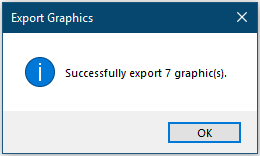
3. Sau đó, một hộp thoại bật lên cho bạn biết có bao nhiêu ảnh đã được xuất thành công, hãy nhấp vào OK .

Bây giờ bạn có thể đi đến thư mục đích và kiểm tra các hình ảnh đã xuất.

Vui lòng nhấp vào Xuất đồ họa để biết thêm về tính năng này.

Trước khi áp dụng Kutools cho Excel, Xin vui lòng tải xuống và cài đặt nó trước tiên.


Xuất hình ảnh và đổi tên chúng bằng các giá trị ô liền kề

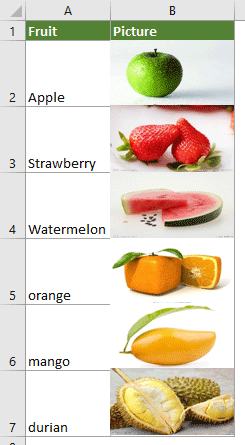
Như thể hiện trong ảnh chụp màn hình bên dưới, có hai cột, một cột chứa danh sách tên trái cây và cột kia chứa hình ảnh tương ứng của các loại trái cây. Để xuất những hình ảnh này và tự động đặt tên chúng với tên trái cây tương ứng, bạn có thể thử mã VBA trong phần này.

1. Trong trang tính mà bạn muốn xuất ảnh, hãy bấm Khác + F11 phím để mở Microsoft Visual Basic cho các ứng dụng cửa sổ.

2. bên trong Microsoft Visual Basic cho các ứng dụng cửa sổ, nhấp Chèn > Module. Và sau đó sao chép VBA sau vào cửa sổ Mô-đun.

Mã VBA: Xuất ảnh trong một cột và đặt tên cho chúng tự động

Sub ExportImages_ExtendOffice()
'Updated by Extendoffice 20220308
    Dim xStrPath As String
    Dim xStrImgName As String
    Dim xImg As Shape
    Dim xObjChar As ChartObject
    Dim xFD As FileDialog
    Set xFD = Application.FileDialog(msoFileDialogFolderPicker)
    xFD.Title = "Please select a folder to save the pictures" & " - ExtendOffice"
    If xFD.Show = -1 Then
       xStrPath = xFD.SelectedItems.Item(1) & "\"
    Else
        Exit Sub
    End If
    
    On Error Resume Next
    For Each xImg In ActiveSheet.Shapes
        If xImg.TopLeftCell.Column = 2 Then
        xStrImgName = xImg.TopLeftCell.Offset(0, -1).Value
        If xStrImgName <> "" Then
            xImg.Select
            
            Selection.Copy
            Set xObjChar = ActiveSheet.ChartObjects.Add(0, 0, xImg.Width, xImg.Height)
            With xObjChar
                .Border.LineStyle = xlLineStyleNone
                .Activate
                ActiveChart.Paste
                .Chart.Export xStrPath & xStrImgName & ".png"
                .Delete
            End With
        End If
        End If
    Next
End Sub

Ghi chú:

1) Số 2 trong dòng “Nếu xImg.TopLeftCell.Column = 2 Thì”Đại diện cho số cột mà bạn muốn xuất ảnh;
2) Số -1 trong dòng “xStrImgName = xImg.TopLeftCell.Offset (0, -1) .Value”Chỉ ra rằng bạn sẽ đặt tên cho các hình ảnh với giá trị của các ô bên trái liền kề.

3. Nhấn nút F5 phím để chạy mã. Trong cửa sổ đang mở, hãy chọn một thư mục để lưu ảnh và sau đó nhấp vào OK.

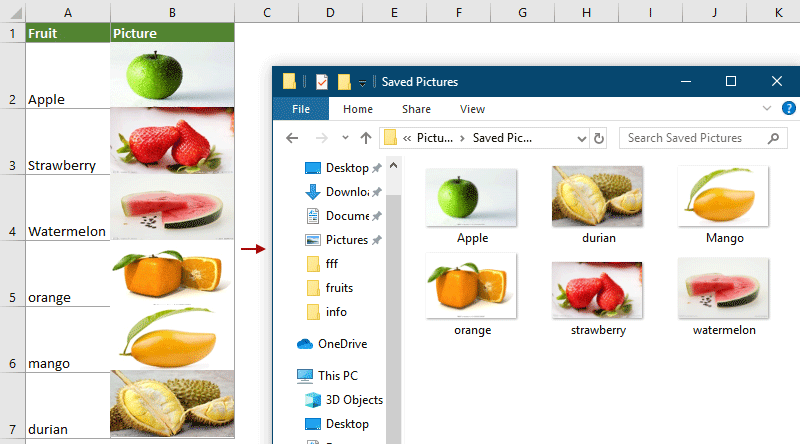
Sau đó, tất cả các ảnh trong một cột được chỉ định sẽ được xuất và tự động được đặt tên với các giá trị ô liền kề như bạn đã chỉ định.


Bài viết liên quan:

Làm cách nào để xuất biểu đồ sang đồ họa trong Excel?

Công cụ năng suất văn phòng tốt nhất

🤖 Trợ lý AI của Kutools: Cách mạng hóa việc phân tích dữ liệu dựa trên: Thực thi thông minh   |  Tạo mã  |  Tạo công thức tùy chỉnh  |  Phân tích dữ liệu và tạo biểu đồ  |  Gọi các hàm Kutools...
Các tính năng phổ biến: Tìm, đánh dấu hoặc xác định các bản sao   |  Xóa hàng trống   |  Kết hợp các cột hoặc ô mà không làm mất dữ liệu   |   Vòng không có công thức hữu ích. Cảm ơn !
Siêu tra cứu: Nhiều tiêu chí VLookup    VLookup Nhiều Giá Trị  |   VLookup trên nhiều trang tính   |   Tra cứu mờ ....
Danh sách thả xuống nâng cao: Tạo nhanh danh sách thả xuống   |  Danh sách thả xuống phụ thuộc   |  Danh sách thả xuống nhiều lựa chọn ....
Trình quản lý cột: Thêm một số cột cụ thể  |  Di chuyển cột  |  Chuyển đổi trạng thái hiển thị của các cột ẩn  |  So sánh dãy và cột hữu ích. Cảm ơn !
Các tính năng nổi bật: Tiêu điểm lưới   |  Chế độ xem thiết kế   |   Thanh công thức lớn    Trình quản lý sổ làm việc & trang tính   |  Thư viện tài nguyên (Văn bản tự động)   |  Bảng chọn ngày   |  Kết hợp các bảng tính   |  Mã hóa/Giải mã ô    Gửi email theo danh sách   |  Siêu lọc   |   Bộ lọc đặc biệt (lọc in đậm/nghiêng/gạch ngang...) ...
15 bộ công cụ hàng đầu12 bản văn CÔNG CỤ (thêm văn bản, Xóa ký tự,...)   |   50 + Biểu đồ Các loại (Biểu đồ Gantt,...)   |   40+ Thực tế Công thức (Tính tuổi dựa trên ngày sinh,...)   |   19 chèn CÔNG CỤ (Chèn mã QR, Chèn ảnh từ đường dẫn,...)   |   12 Chuyển đổi CÔNG CỤ (Số thành từ, Chuyển đổi tiền tệ,...)   |   7 Hợp nhất & Tách CÔNG CỤ (Các hàng kết hợp nâng cao, Chia ô,...)   |   ... và nhiều hơn nữa

Nâng cao kỹ năng Excel của bạn với Kutools for Excel và trải nghiệm hiệu quả hơn bao giờ hết. Kutools for Excel cung cấp hơn 300 tính năng nâng cao để tăng năng suất và tiết kiệm thời gian.  Bấm vào đây để có được tính năng bạn cần nhất...

Mô tả


Tab Office mang lại giao diện Tab cho Office và giúp công việc của bạn trở nên dễ dàng hơn nhiều

  • Cho phép chỉnh sửa và đọc theo thẻ trong Word, Excel, PowerPoint, Publisher, Access, Visio và Project.
  • Mở và tạo nhiều tài liệu trong các tab mới của cùng một cửa sổ, thay vì trong các cửa sổ mới.
  • Tăng 50% năng suất của bạn và giảm hàng trăm cú nhấp chuột cho bạn mỗi ngày!
Comments (24)
Rated 5 out of 5 · 1 ratings
This comment was minimized by the moderator on the site
WaW Amazing ! Thanks a lot ! It works perfect for me !
I couldn't insert Milan's code inside the first one, so maybe you could update with the two codes combined ?
It is because my pictures are so small...
Rated 5 out of 5
This comment was minimized by the moderator on the site
Thank you! The code does the job. The only downside is it exports images in displayed size, not in original size. And it's often the case, when an otherwise large image is scaled down to fit in the cell. Is there a way to tweak this code to export original size images?

Sub ExportImages_ExtendOffice()
'Updated by Extendoffice 20220308
    Dim xStrPath As String
    Dim xStrImgName As String
    Dim xImg As Shape
    Dim xObjChar As ChartObject
    Dim xFD As FileDialog
    Set xFD = Application.FileDialog(msoFileDialogFolderPicker)
    xFD.Title = "Please select a folder to save the pictures" & " - ExtendOffice"
    If xFD.Show = -1 Then
       xStrPath = xFD.SelectedItems.Item(1) & "\"
    Else
        Exit Sub
    End If
    
    On Error Resume Next
    For Each xImg In ActiveSheet.Shapes
        If xImg.TopLeftCell.Column = 2 Then
        xStrImgName = xImg.TopLeftCell.Offset(0, -1).Value
        If xStrImgName <> "" Then
            xImg.Select
            
            Selection.Copy
            Set xObjChar = ActiveSheet.ChartObjects.Add(0, 0, xImg.Width, xImg.Height)
            With xObjChar
                .Border.LineStyle = xlLineStyleNone
                .Activate
                ActiveChart.Paste
                .Chart.Export xStrPath & xStrImgName & ".png"
                .Delete
            End With
        End If
        End If
    Next
End Sub
This comment was minimized by the moderator on the site
same issue...
just a quick edit:
If xStrImgName <> "" Then
            xImg.Select
          [b]  xImg.ScaleHeight 1#, True, msoScaleFromTopLeft
            xImg.ScaleWidth 1#, True, msoScaleFromTopLeft[/b]


this will resize all images, so you have to close the file afterwards without saving to preserve the initial vie, but the pictures will go out in their original size.
This comment was minimized by the moderator on the site
fixed, thank you anyway:

Sub ExportImages_ExtendOffice()
'Updated by Extendoffice 20220308
    Dim xStrPath As String
    Dim xStrImgName As String
    Dim xImg As Shape
    Dim xObjChar As ChartObject
    Dim xFD As FileDialog
    Set xFD = Application.FileDialog(msoFileDialogFolderPicker)
    xFD.Title = "Please select a folder to save the pictures" & " - ExtendOffice"
    If xFD.Show = -1 Then
       xStrPath = xFD.SelectedItems.Item(1) & "\"
    Else
        Exit Sub
    End If
    
    On Error Resume Next
    For Each xImg In ActiveSheet.Shapes
        If xImg.TopLeftCell.Column = 2 Then
        xStrImgName = xImg.TopLeftCell.Offset(0, -1).Value
        If xStrImgName <> "" Then
            xImg.Select
'            Selection.Copy
            Selection.CopyPicture Appearance:=xlScreen, Format:=xlPicture
            Set xObjChar = ActiveSheet.ChartObjects.Add(0, 0, xImg.Width, xImg.Height)
            With xObjChar
                .Parent.ShapeRange.Line.Visible = msoFalse
                .Border.LineStyle = xlLineStyleNone
'                .Activate
                .Select
                ActiveChart.Paste
                .Chart.Export xStrPath & xStrImgName & ".png"
                .Delete
            End With
        End If
        End If
    Next
End Sub
This comment was minimized by the moderator on the site
Thank you for this great tool, It saved me a ton of time. But I've ran into an issue that most of the photos are saved as blank photos as shown in the attached screenshot. Appreciate the help. Thank you
This comment was minimized by the moderator on the site
Hello, Mohamed
Did your problem occur when using Kutools for Excel? If so, could you upload your workbook file here if you don't mind?
So that, we can check where the problem is?
Thank you!
This comment was minimized by the moderator on the site
I am using the code given in the " Export images and rename them with the adjacent cell values" part of the article. When I run this code I get the following error: "Run-time error '91': Object variable or With block variable not set."

When I click "debug" it points me to line 9 of the code :
xFD.Title = "Please select a folder to save the pictures" & " - ExtendOffice"

Do you have a solution to this? Your article is the only solution I can find.

I am using Excel for Mac.
This comment was minimized by the moderator on the site
Hello, Dylan,

Sorry, our code is only applicable to Microsoft Excel, maybe you can try the code in Microsoft Excel.
Thank you!
This comment was minimized by the moderator on the site
I am using Microsoft Excel on Mac OSX.
This comment was minimized by the moderator on the site
I am also getting this issue using a Mac - Dylan were you able to resolve?

Are we meant to change something with the below that it is picking up as a bug?

xFD.Title = "Please select a folder to save the pictures" & " - ExtendOffice"
This comment was minimized by the moderator on the site
Hello, thank you for this article. When I execute the code above from Export images and rename them with the adjacent cell values, I get the following error message: Run-time error '91': Object variable or With block variable not set. When I click debug, it highlights line 9 of the code. Do you know why this is happening? FYI I am using Excel for Mac OSX. Thank you
This comment was minimized by the moderator on the site
Τέλειο εργαλείο! Όμως το μέγεθος-ανάλυση της εικόνας μικραίνει . Υπάρχει τρόπος να διατηρηθεί η αρχική ανάλυση ?
This comment was minimized by the moderator on the site
Bonjour le code VBA m'enregistre des images blanches je ne comprends pas pourquoi. quelqu'un a une solution ?
This comment was minimized by the moderator on the site
Hello, Sophie,
The code in this article can work well in my Excel, could you upload your Excel file here if you don't mind? So we can help to check the problem for you.
Or you can describe your problem more clear and detailed.
Thank you!
This comment was minimized by the moderator on the site
hallo skyyang, ich habe seit neulich das gleiche problem, viele leere *.png dateien.
Your text to link
bei jedem exportversuch werden andere bilder nicht richtig erfasst.
mfg und danke
This comment was minimized by the moderator on the site
Hello, milan bojic
Which Excel version do you use?
I have tried the code in your workbook, it works well, and all the images in your workbook are exported in the folder and renamed based on the cell value, see screenshot:
https://www.extendoffice.com/images/stories/comments/comment-skyyang/doc-export-images-1.png
This comment was minimized by the moderator on the site
Hello skyyang, it's office 365. your code was working fine until 2 weeks ago, not anymore, see screenshot. meanwhile i found something similar that works, (combined with yours), maybe you can use that for your code.

screenshot:
[img]https://drive.google.com/file/d/1vfRlhpyzqg7QNFeYl53mTvNON3gIrFwv/view?usp=sharing[/img]


Sub BilderExportieren()
    Dim shaBild As Shape
    Dim strZielpfad As String
    strZielpfad = "c:\Tuerliste\img3\" '<== Zielpfad entsprechend anpassen!!
    For Each shaBild In ActiveSheet.Shapes
        BildExportShape shaBild, strZielpfad
    Next shaBild
End Sub

Sub BildExportShape(shaBild As Shape, strZiel As String)
    Dim xStrImgName As String
    Dim chDiagramm As ChartObject
    xStrImgName = shaBild.TopLeftCell.Offset(0, -1).Value
    Application.ScreenUpdating = False
    shaBild.CopyPicture Appearance:=xlScreen, Format:=xlPicture
    Set chDiagramm = ActiveSheet.ChartObjects.Add(0, 0, shaBild.Width, shaBild.Height)
    With chDiagramm.Chart
        ' erforderlich bei Excel2010, da Diagrammfläche automatisch mit Rahmen erstellt wird
        .Parent.ShapeRange.Line.Visible = msoFalse
        ' bei Excel2016 muss die Diagrammfläche selektiert vor .Paste werden - andernfalls ist das Bild leer
        If Val(Application.Version) = 16 Then .ChartArea.Select
        .Paste
        .Export Filename:=strZiel & xStrImgName & ".png", FilterName:="png"
    End With
    chDiagramm.Delete
    Set chDiagramm = Nothing
    Set shaBild = Nothing
    Application.ScreenUpdating = True
End Sub


Thank you anyway
Milan Bojic
This comment was minimized by the moderator on the site
Hello, milan bojic,
Thanks for your code, maybe it can help others in the future. 🙂
This comment was minimized by the moderator on the site
This is great, if I wanted to grab the background colour of a cell (instead of an image) and save that as a image named with the adjacent cell how would that be an easy change to the code?
This comment was minimized by the moderator on the site
Hi Tom,Do you mean saving the background color of the cell as an image and named it with the adjacent cell value?Sorry can't help you with that.
This comment was minimized by the moderator on the site
thanks a lot it helped me a lot
There are no comments posted here yet
Load More
Please leave your comments in English
Posting as Guest
×
Rate this post:
0   Characters
Suggested Locations