Bỏ qua nội dung chính

Làm cách nào để tự động chèn một hàng trống mới bằng Nút lệnh trong Excel?

Trong nhiều trường hợp, bạn có thể cần phải chèn một hàng mới trống vào vị trí được chỉ định trong trang tính của mình. Trong bài viết này, chúng tôi sẽ hướng dẫn bạn cách tự động chèn một hàng trống mới bằng cách nhấp vào Nút lệnh trong Excel.

Chèn một hàng trống mới tự động bằng Nút lệnh


Chèn một hàng trống mới tự động bằng Nút lệnh

Bạn có thể chạy mã VBA sau để chèn một hàng mới trống bằng cách nhấp vào Nút lệnh. Hãy làm như sau.

1. Đầu tiên, bạn cần chèn một nút lệnh. Vui lòng bấm vào Nhà phát triển > Chèn > Nút lệnh (Điều khiển ActiveX). Xem ảnh chụp màn hình:

2. Sau đó, vẽ Nút lệnh vào trang tính mà bạn cần thêm hàng mới, nhấp chuột phải vào Nút lệnh và nhấp Bất động sản từ menu chuột phải.

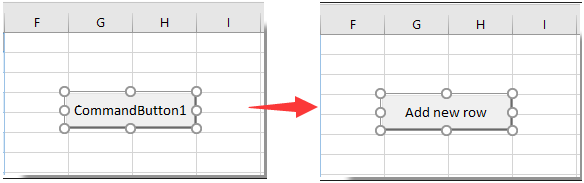
3. bên trong Bất động sản hộp thoại, nhập văn bản được hiển thị của Nút lệnh vào Chú thích hộp dưới Phân loại rồi đóng hộp thoại.

Bạn có thể thấy văn bản hiển thị của Nút lệnh được thay đổi như ảnh chụp màn hình bên dưới.

4. Bấm chuột phải vào Nút lệnh một lần nữa, rồi bấm Mã Chế độ xem từ menu chuột phải.

5. Sau đó Microsoft Visual Basic cho các ứng dụng cửa sổ, vui lòng thay thế mã gốc bằng mã VBA bên dưới vào cửa sổ.

Mã VBA: Tự động chèn hàng mới trống bằng Nút lệnh

Private Sub CommandButton1_Click()
    Dim rowNum As Integer
    On Error Resume Next
    rowNum = Application.InputBox(Prompt:="Enter Row Number where you want to add a row:", _
                                    Title:="Kutools for excel", Type:=1)
    Rows(rowNum & ":" & rowNum).Insert Shift:=xlDown
End Sub

Chú thích: Trong mã, CommanButton1 là tên của Nút lệnh bạn đã tạo.

6. nhấn Khác + Q các phím đồng thời để đóng Microsoft Visual Basic cho các ứng dụng cửa sổ. Và tắt Chế độ thiết kế theo Nhà phát triển tab.

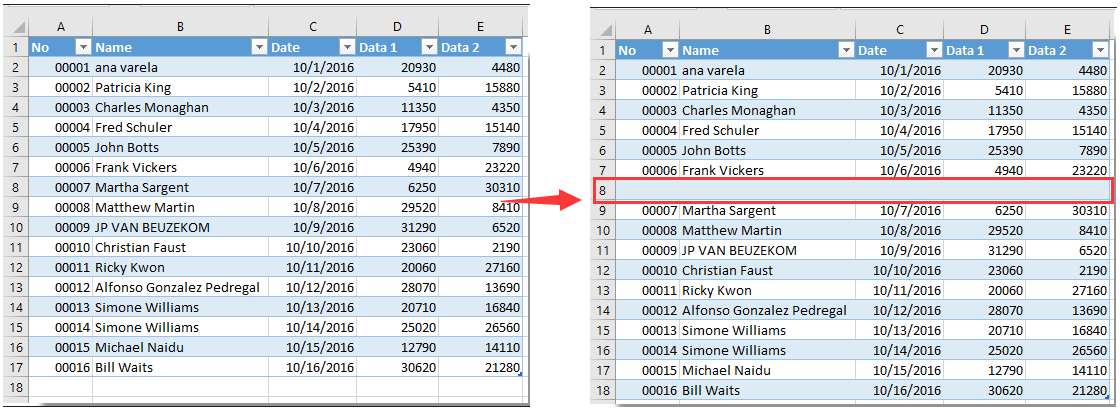
7. Nhấp vào Nút lệnh đã chèn, và Kutools cho Excel hộp thoại bật lên. Vui lòng nhập một số hàng nhất định mà bạn muốn thêm một hàng mới trống, sau đó nhấp vào OK cái nút. Xem ảnh chụp màn hình:

Sau đó, hàng mới trống được chèn vào một vị trí cụ thể của trang tính của bạn như hình ảnh chụp màn hình bên dưới. Và nó giữ nguyên định dạng ô của ô trên.


Các bài liên quan:

Công cụ năng suất văn phòng tốt nhất

🤖 Trợ lý AI của Kutools: Cách mạng hóa việc phân tích dữ liệu dựa trên: Thực thi thông minh   |  Tạo mã  |  Tạo công thức tùy chỉnh  |  Phân tích dữ liệu và tạo biểu đồ  |  Gọi các hàm Kutools...
Các tính năng phổ biến: Tìm, đánh dấu hoặc xác định các bản sao   |  Xóa hàng trống   |  Kết hợp các cột hoặc ô mà không làm mất dữ liệu   |   Vòng không có công thức hữu ích. Cảm ơn !
Siêu tra cứu: Nhiều tiêu chí VLookup    VLookup Nhiều Giá Trị  |   VLookup trên nhiều trang tính   |   Tra cứu mờ ....
Danh sách thả xuống nâng cao: Tạo nhanh danh sách thả xuống   |  Danh sách thả xuống phụ thuộc   |  Danh sách thả xuống nhiều lựa chọn ....
Trình quản lý cột: Thêm một số cột cụ thể  |  Di chuyển cột  |  Chuyển đổi trạng thái hiển thị của các cột ẩn  |  So sánh dãy và cột hữu ích. Cảm ơn !
Các tính năng nổi bật: Tiêu điểm lưới   |  Chế độ xem thiết kế   |   Thanh công thức lớn    Trình quản lý sổ làm việc & trang tính   |  Thư viện tài nguyên (Văn bản tự động)   |  Bảng chọn ngày   |  Kết hợp các bảng tính   |  Mã hóa/Giải mã ô    Gửi email theo danh sách   |  Siêu lọc   |   Bộ lọc đặc biệt (lọc in đậm/nghiêng/gạch ngang...) ...
15 bộ công cụ hàng đầu12 bản văn CÔNG CỤ (thêm văn bản, Xóa ký tự,...)   |   50 + Biểu đồ Các loại (Biểu đồ Gantt,...)   |   40+ Thực tế Công thức (Tính tuổi dựa trên ngày sinh,...)   |   19 chèn CÔNG CỤ (Chèn mã QR, Chèn ảnh từ đường dẫn,...)   |   12 Chuyển đổi CÔNG CỤ (Số thành từ, Chuyển đổi tiền tệ,...)   |   7 Hợp nhất & Tách CÔNG CỤ (Các hàng kết hợp nâng cao, Chia ô,...)   |   ... và nhiều hơn nữa

Nâng cao kỹ năng Excel của bạn với Kutools for Excel và trải nghiệm hiệu quả hơn bao giờ hết. Kutools for Excel cung cấp hơn 300 tính năng nâng cao để tăng năng suất và tiết kiệm thời gian.  Bấm vào đây để có được tính năng bạn cần nhất...

Mô tả


Tab Office mang lại giao diện Tab cho Office và giúp công việc của bạn trở nên dễ dàng hơn nhiều

  • Cho phép chỉnh sửa và đọc theo thẻ trong Word, Excel, PowerPoint, Publisher, Access, Visio và Project.
  • Mở và tạo nhiều tài liệu trong các tab mới của cùng một cửa sổ, thay vì trong các cửa sổ mới.
  • Tăng 50% năng suất của bạn và giảm hàng trăm cú nhấp chuột cho bạn mỗi ngày!
Comments (26)
No ratings yet. Be the first to rate!
This comment was minimized by the moderator on the site
Bedankt voor je uitleg. Ik heb de formule toegepast maar bekom dat ik maar 1 lijn kan toevoegen. Daarna laat de knop het niet meer toe en moet ik eerst mijn toegevoegde rij verwijderen. Is er een manier om dit aan te passen?
This comment was minimized by the moderator on the site
Is there a way to make to row inset always below the last entry?
This comment was minimized by the moderator on the site
How do I do the opposite of this and create a button that will delete a row?
This comment was minimized by the moderator on the site
Hi Big Ant,

Here's the modified code to delete a specified row when the Command Button is clicked:


Private Sub CommandButton1_Click()
'Updated by Extendoffice 20230817
    Dim rowNum As Integer
    On Error Resume Next
    rowNum = Application.InputBox(Prompt:="Enter Row Number which you want to delete:", _
                                    Title:="Kutools for excel", Type:=1)
    If rowNum <> 0 Then
        Rows(rowNum).Delete Shift:=xlUp
    End If
End Sub
This comment was minimized by the moderator on the site
Criei uma linha e nomeei como spotB,
Mudei a altura da linha para 0,01 para ocultá-la (apenas por estética).
Criei um botão:
Application.Goto Reference:="spotB"
Selection.EntireRow.Insert

Problema resolvido.

Obrigado pelos códigos a Mah e crystal, mas eu tinha 8 títulos para separar, cada um inserindo linhas quando necessário ao usuário, e não queria nenhuma pergunta sobre quantidade de linhas, os usuários não leem perguntas e clicam logo em OK, depois reclamam...
This comment was minimized by the moderator on the site
... Testei os códigos acima, mas, como se trata de pessoas que vão usar, não é viável os box que pedem a linha e a quantidade, não dá...
This comment was minimized by the moderator on the site
Caros colegas, após pesquisar (bastante) na net não consegui encontrar um atalho, comando, código, nada, nada, que eu possa usar para inserir em uma macro APENAS uma forma de inserir uma linha ABAIXO da célula ativa. Isto porquê se eu gravar o endereço da célula, ele não muda, fica sempre na mesma célula e as seguintes não vão ficar corretamente abaixo, e se eu usar um endereço de célula fixo, a linha tem que ser inserida acima, mas não formata da forma desejada, que seria o formato das linhas de cima.

Acho que o código existe, só não encontro, já tentei várias formas, selecionando um fixo, subindo uma linha e pedindo para inserir após, mas as seguintes não funcionam de acordo.

Alguém poderia me ajudar?
This comment was minimized by the moderator on the site
Hi

I used the code but wanted to add rows with formulas, therefore I added the last line to be able to add the rows with formulas.
However, in my excel file and in column "F" I have a text which can be entered manually and would be different in different cases. Therefore, I would like to add rows below the reference row with keeping the formulas and values in all cells except the cell from column "F" which I would like to be copied as blank!
Could you please help me with what should I add to the underneath code to be able to have the cells of column "F" blank whenever I add a row with this code?
thanks in advance!

Private Sub CommandButton1_Click()
Dim xIntRrow As Integer
Dim rowNum As Integer
On Error Resume Next
rowNum = Application.InputBox(Prompt:="Enter Row Number where you want to add a row:", _
Title:="Kutools for excel", Type:=1)
xIntRrow = Application.InputBox(Prompt:="Type in the number of rows you want to insert", _
Title:="Kutools for excel", Type:=1)
Rows(rowNum + 1 & ":" & rowNum + 1).EntireRow.Resize(xIntRrow).Insert Shift:=xlShiftDown
Rows(rowNum).Resize(xIntRrow + 1).FillDown

End Sub
This comment was minimized by the moderator on the site
Hi Mah,
The following VBA code may do you a favor. Please give it a try. Thank you.

Private Sub CommandButton1_Click()
'Updated by Extendoffice 20220707
    Dim rowNum As Integer
    Dim xRg1, xRg2 As Range
    
    On Error Resume Next
    
    rowNum = Application.InputBox(Prompt:="Enter Row Number where you want to add a row:", _
                                    Title:="Kutools for excel", Type:=1)
    
    Rows(rowNum & ":" & rowNum).Insert Shift:=xlDown
    Rows((rowNum - 1) & ":" & (rowNum - 1)).Copy
    Rows(rowNum & ":" & rowNum).Select
    Selection.PasteSpecial Paste:=xlPasteAll, Operation:=xlNone, SkipBlanks:= _
        False, Transpose:=False
    Range("F" & rowNum).Value = ""
End Sub
This comment was minimized by the moderator on the site
Sub AddNewRow()


Private Sub CommandButton1_Click()

ActiveSheet.Unprotect Password:="1234"


Dim mySheets

Dim i As Long


mySheets = Array("Sheet2")


For i = LBound(mySheets) To UBound(mySheets)

With Sheets(mySheets(i))

.Range("B10").EntireRow.Insert Shift:=xlDown

.Range("B10:H10").Borders.Weight = xlThin

End With

Next i


ActiveSheet.Protect Password:="1234"


End Sub

I don't know if this will work for you. It worked quite well for me. I even left unprotected cells that you can input data and the formulas are still active. Took me a whole day to figure it out. replace "1234" with whatever password you feel like, "Sheet2" with the Sheet you are working with and input the range you want.
The code first unprotects the worksheet, adds row and protects the worksheet.
This comment was minimized by the moderator on the site
is it possible to create in a different sheet? I really need that
This comment was minimized by the moderator on the site
can possible insert multiple sheet row at one time click by this .
This comment was minimized by the moderator on the site
Hi,
The below code can help you solve the problem. Please have a try.

Private Sub CommandButton1_Click()
Dim xIntRrow As Integer
Dim rowNum As Integer
On Error Resume Next
rowNum = Application.InputBox(Prompt:="Enter Row Number where you want to add a row:", _
Title:="Kutools for excel", Type:=1)
xIntRrow = Application.InputBox(Prompt:="Type in the number of rows you want to insert", _
Title:="Kutools for excel", Type:=1)
Rows(rowNum + 1 & ":" & rowNum + 1).EntireRow.Resize(xIntRrow).Insert Shift:=xlShiftDown

End Sub
There are no comments posted here yet
Load More
Please leave your comments in English
Posting as Guest
×
Rate this post:
0   Characters
Suggested Locations