Làm cách nào để in tất cả các tệp đính kèm trong một / nhiều email trong Outlook?
Như bạn đã biết, nó sẽ chỉ in nội dung email như tiêu đề, nội dung khi bạn nhấp vào Tập tin > In trong Microsoft Outlook, nhưng không in phần đính kèm. Sau đây, chúng tôi sẽ chỉ cho bạn cách in tất cả các tệp đính kèm trong một email đã chọn một cách dễ dàng trong Microsoft Outlook.
- In tất cả các tệp đính kèm trong từng email một
- In hàng loạt tất cả các tệp đính kèm trong một email
- In hàng loạt tất cả các tệp đính kèm và hình ảnh trong nhiều email đã chọn
- In hàng loạt tất cả các tệp đính kèm trong nhiều email đã chọn ngoại trừ ảnh trong nội dung
In tất cả các tệp đính kèm trong từng email một
Microsoft Outlook cung cấp cho chúng tôi In nhanh tính năng này có thể giúp bạn in từng tệp đính kèm trong một email.
1. Chọn thư email có tệp đính kèm mà bạn sẽ in sau này.
2. Nhấp vào một tệp đính kèm trong email này.

3. Nhấn vào In nhanh nút trong Hoạt động nhóm trên File đính kèm tab.
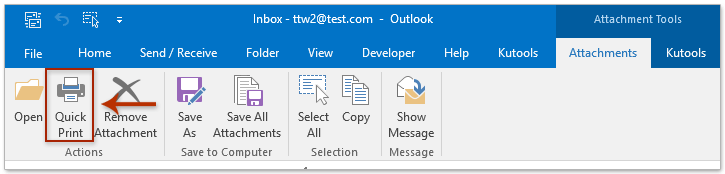
Lưu ý: Công cụ đính kèm sẽ không được kích hoạt cho đến khi bạn nhấp vào tệp đính kèm trong email.
4. Hộp thoại Mở Đính kèm Thư xuất hiện và vui lòng nhấp vào Mở .
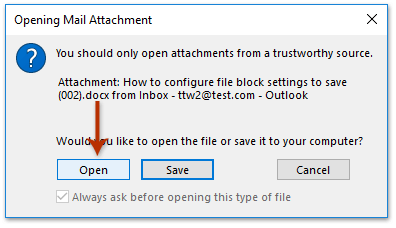
Xin lưu ý rằng bước này sẽ mở tệp đính kèm đã chọn và in tệp đính kèm đã chọn này cùng một lúc.
Để in các tệp đính kèm khác trong email này, vui lòng lặp lại Bước 2 đến Bước 4.
Nhanh chóng lưu / xuất tất cả các tệp đính kèm từ nhiều email trong Outlook
Thông thường, chúng tôi có thể lưu tệp đính kèm từ một email bằng cách kích hoạt Công cụ đính kèm và áp dụng Lưu tất cả các tệp đính kèm tính năng trong Outlook. Nhưng, điều gì sẽ xảy ra nếu lưu tệp đính kèm từ nhiều email hoặc từ toàn bộ thư mục thư trong Outlook? Dùng thử Kutools cho Outlook's Lưu tất cả (Phần đính kèm) tính năng.
In hàng loạt tất cả các tệp đính kèm trong một email
Nếu có nhiều tệp đính kèm trong một email, việc in từng tệp một sẽ rất tốn thời gian. Và phương pháp sau đây sẽ hướng dẫn bạn in hàng loạt tất cả các tệp đính kèm trong một email đã chọn một cách dễ dàng.
1. Chọn thư email có tệp đính kèm mà bạn sẽ in sau này.
2. Trong phiên bản Outlook 2010 trở lên, vui lòng nhấp vào Tập tin > In > Tùy chọn in. Xem ảnh chụp màn hình sau:
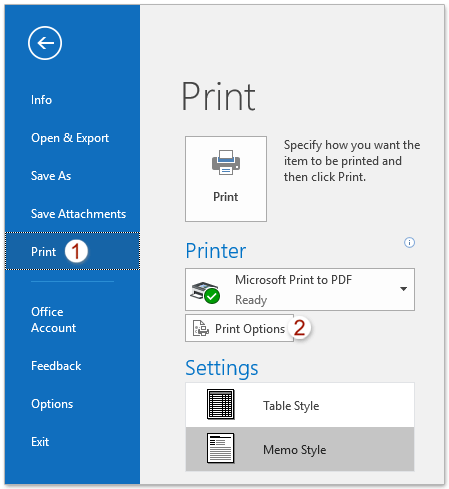
3. Trong hộp thoại In, vui lòng kiểm tra In các tập tin đính kèm. Tệp đính kèm sẽ chỉ in ra máy in mặc định tùy chọn trong Tùy chọn in phần.
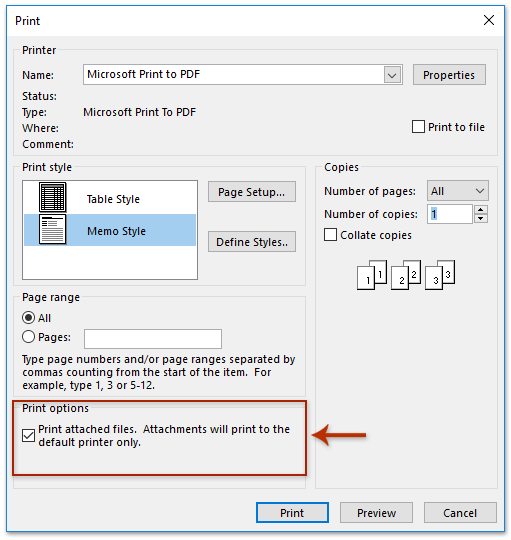
4. Nhấn vào In .
5. Trong hộp thoại Mở Tệp đính kèm Thư hiện ra, vui lòng nhấp vào Mở để tiếp tục. (Chú thích: Hộp thoại này sẽ bật ra cho từng tệp đính kèm riêng biệt.)
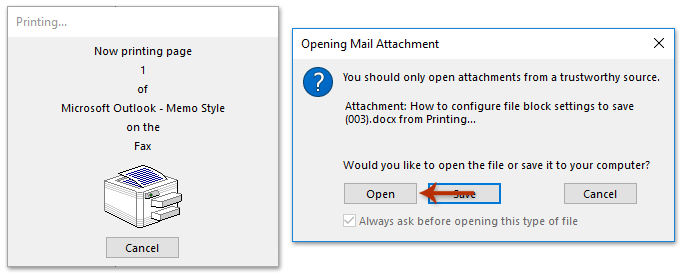
Bây giờ tất cả các tệp đính kèm trong thông báo email đã chọn này sẽ được in cùng một lúc.
In hàng loạt tất cả các tệp đính kèm và hình ảnh trong nhiều email đã chọn
Để in tất cả các tệp đính kèm trong nhiều email cũng như tất cả ảnh trong nội dung thư trong Outlook, vui lòng làm theo các bước dưới đây để áp dụng mã VBA.
1. Trong danh sách gửi thư, vui lòng giữ Ctrl or sự thay đổi để chọn nhiều email có tệp đính kèm mà bạn sẽ in.
2. nhấn Khác + F11 các phím với nhau để mở cửa sổ Microsoft Visual Basic for Applications.
3. Trong cửa sổ Microsoft Visual Basic for Applications, bấm CÔNG CỤ
> dự án. Và sau đó kiểm tra Thời gian chạy tập lệnh của Microsoft tùy chọn như hình dưới đây. Sau khi hoàn tất, hãy nhấp vào OK.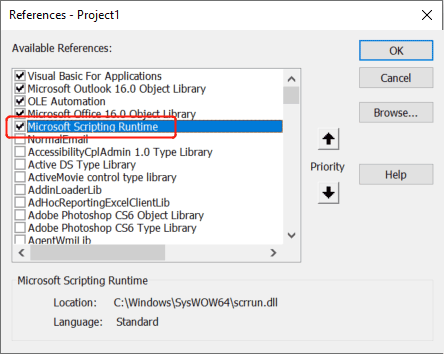
4. Nhấp chuột Chèn > Mô-đun, rồi dán mã VBA bên dưới vào cửa sổ mô-đun mới.
VBA: In tất cả các tệp đính kèm trong nhiều email Outlook
Sub PrintAllAttachmentsInMultipleMails()
  'Update by ExtendOffice 2022/08/03
  Dim xShellApp As Object
  Dim xFSO As Scripting.FileSystemObject
  Dim xItem As Object
  Dim xTempFldPath, xFilePath As String
  Dim xSelItems As Outlook.Selection
  Dim xMailItem As Outlook.MailItem
  Dim xAttachments As Outlook.Attachments
  Dim xAttachment As Outlook.Attachment
  Dim xFile As File
  On Error Resume Next
  Set xFSO = New Scripting.FileSystemObject
  xTempFldPath = xFSO.GetSpecialFolder(2).Path & "\Attachments " & Format(Now, "yyyymmddhhmmss") 'xFSO.GetSpecialFolder(2) For saving temporary files
  If xFSO.FolderExists(xTemfldpath) = False Then 'create temporary folder
    xFSO.CreateFolder (xTempFldPath)
  End If
  Set xSelItems = Outlook.ActiveExplorer.Selection
  Set xShellApp = CreateObject("Shell.Application")
  For Each xItem In xSelItems
    If xItem.Class = OlObjectClass.olMail Then
      Set xMailItem = xItem
      Set xAttachments = xMailItem.Attachments
      For Each xAttachment In xAttachments
        xFilePath = xTempFldPath & "\" & xAttachment.FileName
        xAttachment.SaveAsFile (xFilePath)
      Next
    End If
  Next
  For Each xFile In xFSO.GetFolder(xTempFldPath).Files
    VBA.DoEvents
    Call xShellApp.ShellExecute(xFile.Path, "", "", "print", 0)
  Next
  Set xSelItems = Nothing
  Set xShellApp = Nothing
  Set xFSO = Nothing
End Sub
5. nhấn F5 phím hoặc nhấp vào chạy để chạy mã VBA này. Bây giờ bạn sẽ thấy rằng tất cả các tệp đính kèm trong các email đã chọn và ảnh trong phần thân meesage đều được in ra.
Lưu ý:
- Mỗi hình ảnh sẽ xuất hiện một hộp thoại bật lên để yêu cầu bạn xác nhận việc in. Trong khi các loại tập tin khác sẽ được in trực tiếp.
- Nếu có hình ảnh trong chữ ký email, chúng cũng sẽ hiển thị hộp thoại bật lên.
- Nếu bạn nhận được Các macro trong dự án này đã bị vô hiệu hóa lỗi, vui lòng kiểm tra hướng dẫn này: Làm thế nào để kích hoạt và vô hiệu hóa Macro trong Outlook?
In hàng loạt tất cả các tệp đính kèm trong nhiều email đã chọn ngoại trừ ảnh trong nội dung
Để chỉ in tệp đính kèm trong nhiều email trừ ảnh trong nội dung thư trong Outlook, vui lòng làm theo các bước dưới đây để áp dụng mã VBA.
1. Trong danh sách gửi thư, vui lòng giữ Ctrl or sự thay đổi để chọn nhiều email có tệp đính kèm mà bạn sẽ in.
2. nhấn Khác + F11 các phím với nhau để mở cửa sổ Microsoft Visual Basic for Applications.
3. Trong cửa sổ Microsoft Visual Basic for Applications, bấm CÔNG CỤ
> dự án. Và sau đó kiểm tra Thời gian chạy tập lệnh của Microsoft tùy chọn như hình dưới đây. Sau khi hoàn tất, hãy nhấp vào OK.
4. Nhấp chuột Chèn > Mô-đun, rồi dán mã VBA bên dưới vào cửa sổ mô-đun mới.
VBA: In tất cả các tệp đính kèm trong nhiều email Outlook
Sub PrintAllAttachmentsInMultipleMails()
  'Update by ExtendOffice 2022/08/05
  Dim xShellApp As Object
  Dim xFSO As Scripting.FileSystemObject
  Dim xItem As Object
  Dim xTempFldPath, xFilePath As String
  Dim xSelItems As Outlook.Selection
  Dim xMailItem As Outlook.MailItem
  Dim xAttachments As Outlook.Attachments
  Dim xAttachment As Outlook.Attachment
  Dim xFile As File
  On Error Resume Next
  Set xFSO = New Scripting.FileSystemObject
  xTempFldPath = xFSO.GetSpecialFolder(2).Path & "\Attachments " & Format(Now, "yyyymmddhhmmss") 'xFSO.GetSpecialFolder(2) For saving temporary files
  If xFSO.FolderExists(xTemfldpath) = False Then 'create temporary folder
    xFSO.CreateFolder (xTempFldPath)
  End If
  Set xSelItems = Outlook.ActiveExplorer.Selection
  Set xShellApp = CreateObject("Shell.Application")
  For Each xItem In xSelItems
    If xItem.Class = OlObjectClass.olMail Then
      Set xMailItem = xItem
      Set xAttachments = xMailItem.Attachments
      For Each xAttachment In xAttachments
        If IsEmbeddedAttachment(xAttachment) = False Then
          xFilePath = xTempFldPath & "\" & xAttachment.FileName
          xAttachment.SaveAsFile (xFilePath)
          Debug.Print xFilePath
        End If
      Next
    End If
  Next
  For Each xFile In xFSO.GetFolder(xTempFldPath).Files
    VBA.DoEvents
    Call xShellApp.ShellExecute(xFile.Path, "", "", "print", 0)
  Next
  Set xSelItems = Nothing
  Set xShellApp = Nothing
  Set xFSO = Nothing
End Sub

Function IsEmbeddedAttachment(Attach As Attachment)
Dim xItem As MailItem
Dim xCid As String
Dim xID As String
Dim xHtml As String
On Error Resume Next
IsEmbeddedAttachment = False
Set xItem = Attach.Parent
If xItem.BodyFormat <> olFormatHTML Then Exit Function
xCid = ""
xCid = Attach.PropertyAccessor.GetProperty("http://schemas.microsoft.com/mapi/proptag/0x3712001F")
If xCid <> "" Then
    xHtml = xItem.HTMLBody
    xID = "cid:" & xCid
    If InStr(xHtml, xID) > 0 Then
        IsEmbeddedAttachment = True
    End If
End If
End Function
5. nhấn F5 phím hoặc nhấp vào chạy để chạy mã VBA này. Bây giờ bạn sẽ thấy rằng tất cả các tệp đính kèm trong các email đã chọn đã được in ra.
Lưu ý:
- Mỗi hình ảnh đính kèm sẽ xuất hiện một hộp thoại bật lên để yêu cầu bạn xác nhận việc in. Trong khi các loại tập tin khác sẽ được in trực tiếp.
- Hình ảnh trong nội dung thư sẽ không được in.
- Nếu bạn nhận được Các macro trong dự án này đã bị vô hiệu hóa lỗi, vui lòng kiểm tra hướng dẫn này: Làm thế nào để kích hoạt và vô hiệu hóa Macro trong Outlook?
Demo: in một hoặc tất cả các tệp đính kèm trong email Outlook
Mẹo: Trong Video này, Kutools tab được thêm bởi Kutools cho Outlook. Nếu bạn cần nó, xin vui lòng bấm vào Ở đây để có 60 ngày dùng thử miễn phí không giới hạn!
Công cụ năng suất văn phòng tốt nhất
Kutools cho Outlook - Hơn 100 tính năng mạnh mẽ để tăng cường Outlook của bạn
📧 Tự động hoá email: Vắng Mặt (Có sẵn cho POP và IMAP) / Lên lịch gửi email / Tự động CC/BCC theo quy định khi gửi Email / Tự động chuyển tiếp (Quy tắc nâng cao) / Tự động thêm lời chào / Tự động chia email nhiều người nhận thành các tin nhắn riêng lẻ hữu ích. Cảm ơn !
📨 Quản lý email: Dễ dàng thu hồi email / Chặn email lừa đảo theo chủ đề và những người khác / Xóa các email trùng lặp / Tìm Kiếm Nâng Cao / Hợp nhất các thư mục hữu ích. Cảm ơn !
📁 Tệp đính kèm chuyên nghiệp: Lưu hàng loạt / Tách hàng loạt / Nén hàng loạt / Tự động lưu / Tự động tách / Tự động nén hữu ích. Cảm ơn !
🌟 Giao diện ma thuật: 😊Thêm nhiều biểu tượng cảm xúc đẹp và thú vị hơn / Tăng năng suất Outlook của bạn với chế độ xem theo thẻ / Thu nhỏ Outlook thay vì đóng hữu ích. Cảm ơn !
👍 Kỳ quan chỉ bằng một cú nhấp chuột: Trả lời tất cả bằng tệp đính kèm đến / Email chống lừa đảo / 🕘Hiển thị múi giờ của người gửi hữu ích. Cảm ơn !
👩🏼🤝👩🏻 Danh bạ & Lịch: Thêm hàng loạt liên hệ từ các email đã chọn / Chia nhóm liên hệ thành các nhóm riêng lẻ / Xóa lời nhắc sinh nhật hữu ích. Cảm ơn !
Trên 100 tính năng Chờ đợi sự khám phá của bạn! Bấm vào đây để khám phá thêm.

