Làm cách nào để tự động in tệp đính kèm khi email đến trong Outlook?
Hướng dẫn này trình bày phương pháp kết hợp tập lệnh VBA và quy tắc Outlook để giúp bạn tự động in tệp đính kèm của một số email nhất định khi chúng đến trong Outlook.
Tự động in tệp đính kèm khi có một số email nhất định đến
Giả sử, bạn muốn tự động in các tệp đính kèm của email đến từ một người gửi nhất định. Bạn có thể làm như sau để hoàn thành công việc.
Bước 1: Tạo tập lệnh trong Outlook
Trước tiên, bạn cần tạo một tập lệnh VBA trong Outlook.
1. Khởi chạy Outlook của bạn, nhấn Khác + F11 các phím đồng thời để mở Microsoft Visual Basic cho các ứng dụng cửa sổ.
2. bên trong Microsoft Visual Basic cho các ứng dụng cửa sổ, nhấp đúp vào Project1 > Đối tượng Microsoft Outlook > ĐâyOutlookSession để mở ThisOutlookSession (Mã) cửa sổ, và sau đó sao chép mã sau vào cửa sổ mã này.
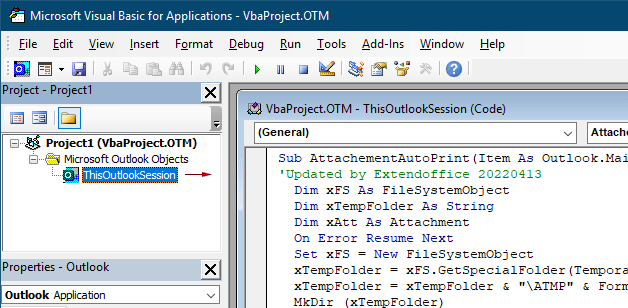
Mã VBA 1: Tự động in tệp đính kèm (tất cả các loại tệp đính kèm) khi có email
Sub AttachementAutoPrint(Item As Outlook.MailItem)
'Updated by Extendoffice 20230223
  Dim xFS As FileSystemObject
  Dim xTempFolder As String
  Dim xAtt As Attachment
  Dim xShell As Object
  Dim xFolder As Object, xFolderItem As Object
  Dim xFileName As String
  On Error GoTo xError
  If Item.Attachments.Count = 0 Then Exit Sub
  Set xFS = New FileSystemObject
  xTempFolder = xFS.GetSpecialFolder(TemporaryFolder)
  xTempFolder = xTempFolder & "\ATMP" & Format(Item.ReceivedTime, "yyyymmddhhmmss")
  If Not xFS.FolderExists(xTempFolder) Then
    MkDir (xTempFolder)
  End If
  Set xShell = CreateObject("Shell.Application")
  Set xFolder = xShell.NameSpace(0)
  For Each xAtt In Item.Attachments
    If IsEmbeddedAttachment(xAtt) = False Then
      xFileName = xTempFolder & "\" & xAtt.FileName
      xAtt.SaveAsFile (xFileName)
      Set xFolderItem = xFolder.ParseName(xFileName)
      xFolderItem.InvokeVerbEx ("print")
    End If
  Next xAtt
  Set xFS = Nothing
  Set xFolder = Nothing
  Set xFolderItem = Nothing
  Set xShell = Nothing
xError:
  If Err <> 0 Then
    MsgBox Err.Number & " - " & Err.Description, , "Kutools for Outlook"
    Err.Clear
  End If
Exit Sub
End Sub

Function IsEmbeddedAttachment(Attach As Attachment)
Dim xItem As MailItem
Dim xCid As String
Dim xID As String
Dim xHtml As String
On Error Resume Next
IsEmbeddedAttachment = False
Set xItem = Attach.Parent
If xItem.BodyFormat <> olFormatHTML Then Exit Function
xCid = ""
xCid = Attach.PropertyAccessor.GetProperty("http://schemas.microsoft.com/mapi/proptag/0x3712001F")
If xCid <> "" Then
    xHtml = xItem.HTMLBody
    xID = "cid:" & xCid
    If InStr(xHtml, xID) > 0 Then
        IsEmbeddedAttachment = True
    End If
End If
End Function
Lưu ý: Mã này hỗ trợ in tất cả các loại tệp đính kèm nhận được trong email. Nếu bạn chỉ muốn in loại tệp đính kèm được chỉ định, chẳng hạn như tệp pdf, vui lòng áp dụng mã VBA sau.
Mã VBA 2: Tự động in loại tệp đính kèm được chỉ định khi có email
Sub AttachementAutoPrint(Item As Outlook.MailItem)
'Updated by Extendoffice 20230223
  Dim xFS As FileSystemObject
  Dim xTempFolder As String
  Dim xAtt As Attachment
  Dim xShell As Object
  Dim xFolder As Object, xFolderItem As Object
  Dim xFileType As String, xFileName As String
  On Error GoTo xError
  If Item.Attachments.Count = 0 Then Exit Sub
  Set xFS = New FileSystemObject
  xTempFolder = xFS.GetSpecialFolder(TemporaryFolder)
  xTempFolder = xTempFolder & "\ATMP" & Format(Item.ReceivedTime, "yyyymmddhhmmss")
  If Not xFS.FolderExists(xTempFolder) Then
    MkDir (xTempFolder)
  End If
  Set xShell = CreateObject("Shell.Application")
  Set xFolder = xShell.NameSpace(0)
  For Each xAtt In Item.Attachments
    If IsEmbeddedAttachment(xAtt) = False Then
      xFileName = xAtt.FileName
      xFileType = LCase$(Right$(xFileName, VBA.Len(xFileName) - VBA.InStrRev(xFileName, ".")))
      xFileName = xTempFolder & "\" & xFileName
      Select Case xFileType
        Case "pdf"   'change "pdf" to the file extension you want to print
          xAtt.SaveAsFile (xFileName)
          Set xFolderItem = xFolder.ParseName(xFileName)
          xFolderItem.InvokeVerbEx ("print")
      End Select
    End If
  Next xAtt
  Set xFS = Nothing
  Set xFolder = Nothing
  Set xFolderItem = Nothing
  Set xShell = Nothing
xError:
  If Err <> 0 Then
    MsgBox Err.Number & " - " & Err.Description, , "Kutools for Outlook"
    Err.Clear
  End If
  Exit Sub
End Sub

Function IsEmbeddedAttachment(Attach As Attachment)
Dim xItem As MailItem
Dim xCid As String
Dim xID As String
Dim xHtml As String
On Error Resume Next
IsEmbeddedAttachment = False
Set xItem = Attach.Parent
If xItem.BodyFormat <> olFormatHTML Then Exit Function
xCid = ""
xCid = Attach.PropertyAccessor.GetProperty("http://schemas.microsoft.com/mapi/proptag/0x3712001F")
If xCid <> "" Then
    xHtml = xItem.HTMLBody
    xID = "cid:" & xCid
    If InStr(xHtml, xID) > 0 Then
        IsEmbeddedAttachment = True
    End If
End If
End Function
Chú ý:
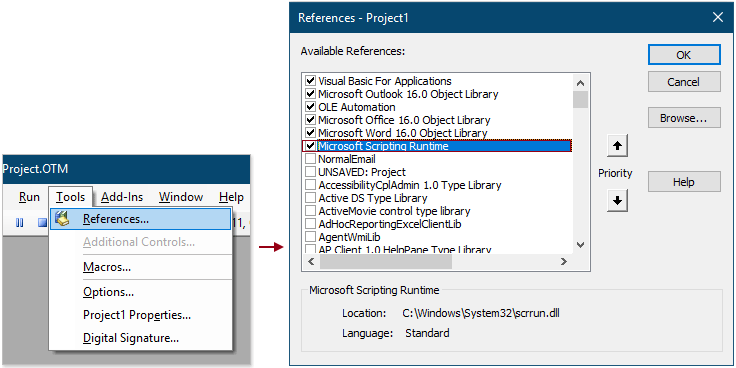
3. Tiếp tục và nhấp vào CÔNG CỤ > Tài liệu tham khảo. Trong cửa sổ bật lên Tài liệu tham khảo - Project1 hộp thoại, kiểm tra Thời gian chạy tập lệnh của Microsoft và sau đó bấm vào OK .
4. Lưu mã và nhấn Khác + Q chìa khóa để đóng Microsoft Visual Basic cho các ứng dụng cửa sổ.
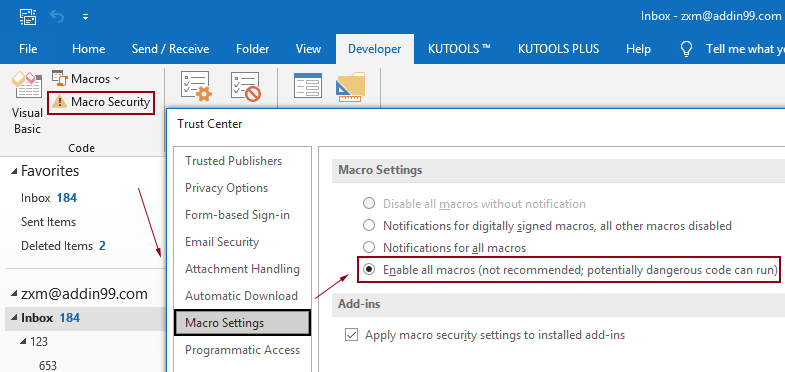
Lưu ý: Hãy chắc chắn rằng Bật tất cả các macro tùy chọn được bật trong Outlook của bạn. Bạn có thể kiểm tra tùy chọn này bằng cách làm theo các bước được hiển thị bên dưới.
Bước 2: Xây dựng quy tắc để sử dụng tập lệnh
Sau khi thêm tập lệnh VBA trong Outlook, bạn cần tạo quy tắc để sử dụng tập lệnh dựa trên các điều kiện nhất định.
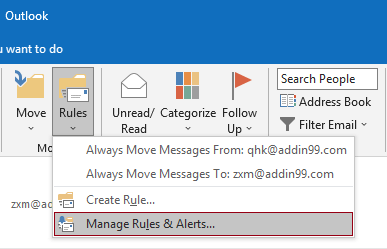
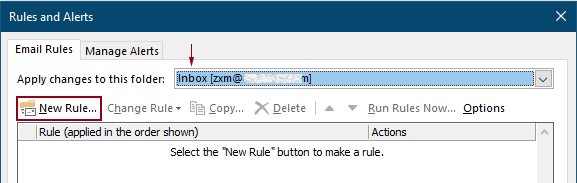
1. Chuyển đến tab Trang chủ, nhấp vào Nội quy > Quản lý Quy tắc & Cảnh báo.
2. bên trong Quy tắc và Cảnh báo hộp thoại, nhấp vào Quy tắc mới để tạo quy tắc.
Lời khuyên: Nếu bạn đã thêm nhiều tài khoản email vào Outlook của mình, vui lòng chỉ định một tài khoản trong Áp dụng các thay đổi cho thư mục này danh sách thả xuống nơi bạn muốn áp dụng quy tắc. Nếu không, nó sẽ được áp dụng cho hộp thư đến của tài khoản email hiện được chọn.
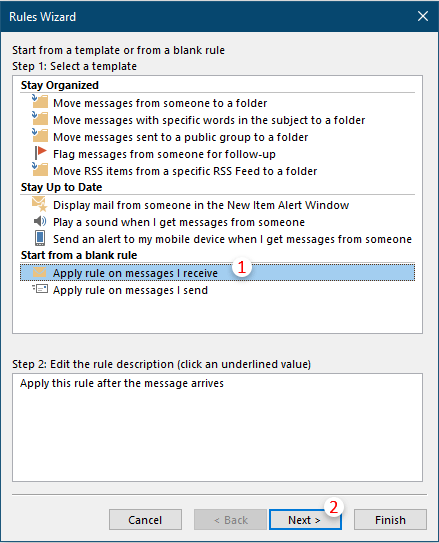
3. Trong lần đầu tiên Trình hướng dẫn quy tắc hộp thoại, chọn Áp dụng quy tắc về thư tôi nhận được trong Bước 1 hộp, và sau đó nhấp vào Tiếp theo.
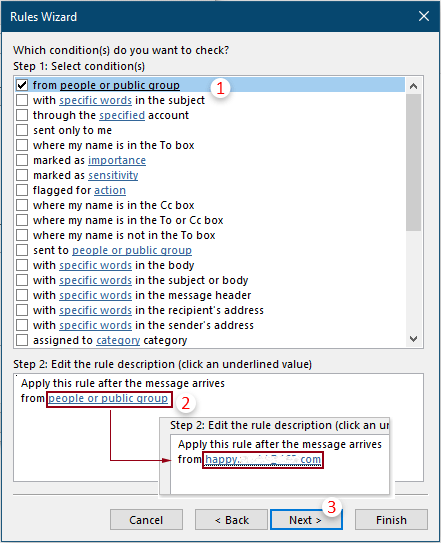
4. Trong giây Trình hướng dẫn quy tắc hộp thoại, bạn cần:
5. Trong phần ba Trình hướng dẫn quy tắc hộp thoại, bạn cần cấu hình như sau.
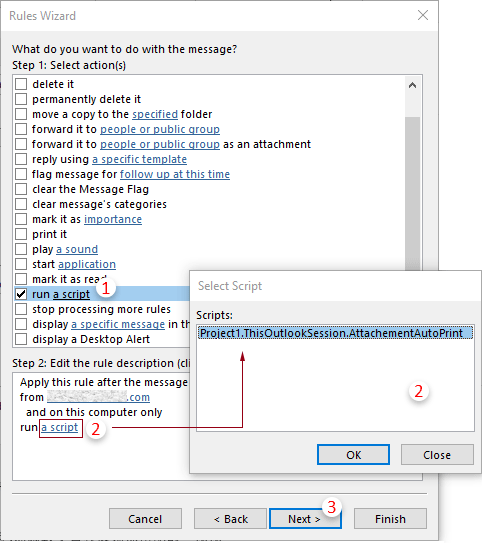
Lời khuyên: Nếu người Vikingchạy một tập lệnh”Tùy chọn bị thiếu trong Trình hướng dẫn quy tắc, bạn có thể hiển thị nó bằng cách làm theo phương pháp được đề cập trong bài viết này: khôi phục mã lệnh Run A Script bị thiếu trong quy tắc Outlook.
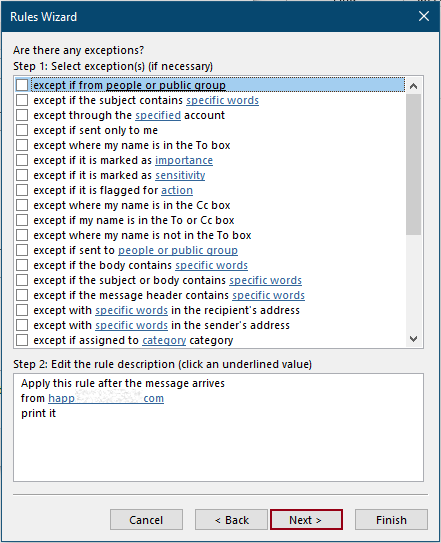
6. Sau đó khác Trình hướng dẫn quy tắc bật lên yêu cầu các trường hợp ngoại lệ. Bạn có thể chọn các ngoại lệ nếu cần, nếu không, hãy nhấp vào Sau nút không có bất kỳ lựa chọn nào。
7. Cuối cùng Trình hướng dẫn quy tắc, bạn cần chỉ định tên cho quy tắc, sau đó nhấp vào Kết thúc .
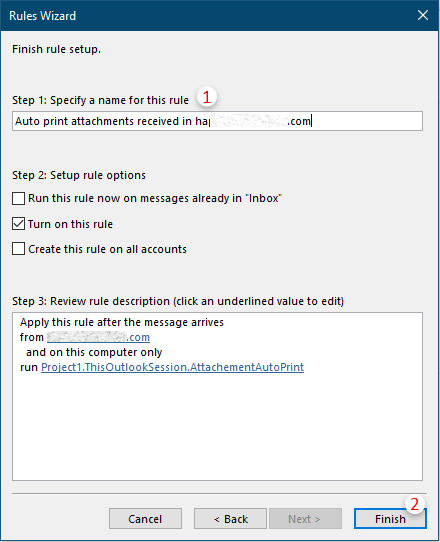
8. Sau đó, nó trở về Quy tắc và Cảnh báo hộp thoại, bạn có thể thấy quy tắc bạn đã tạo được liệt kê bên trong, nhấp vào OK để hoàn tất toàn bộ cài đặt.
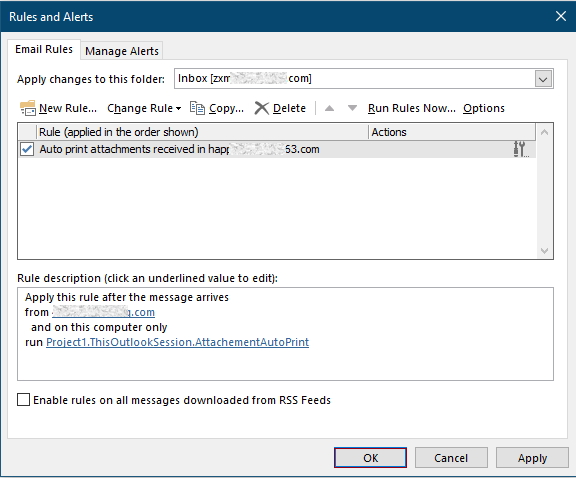
Kể từ bây giờ, khi nhận được email từ người được chỉ định, các tệp đính kèm sẽ được in tự động.
Các bài liên quan
Chỉ in (S) tệp đính kèm từ một email hoặc các email đã chọn trong Outlook
Trong Outlook, bạn có thể in các email, nhưng bạn đã in các tệp đính kèm chỉ từ một email hoặc các email đã chọn trong Outlook chưa? Bài viết này giới thiệu các thủ thuật để giải quyết công việc này.
Chỉ in tiêu đề thư của email trong Outlook
Khi in email trong Outlook, nó sẽ in cả tiêu đề thư và nội dung thư trong email. Tuy nhiên, trong một số trường hợp đặc biệt, bạn có thể chỉ cần in tiêu đề thư với chủ đề, người gửi, người nhận,… Bài viết này sẽ giới thiệu hai giải pháp để thực hiện.
In lịch trong phạm vi ngày được chỉ định / tùy chỉnh trong Outlook
Thông thường, khi in lịch ở dạng xem Tháng trong Outlook, nó sẽ tự động chọn tháng có chứa ngày hiện được chọn. Tuy nhiên, bạn có thể cần in lịch trong một phạm vi ngày tùy chỉnh, chẳng hạn như 3 tháng, nửa năm,… Bài viết này sẽ giới thiệu giải pháp cho bạn.
In một liên hệ bằng hình ảnh trong Outlook
Thông thường, ảnh của liên hệ sẽ không được in ra khi in liên hệ trong Outlook. Nhưng đôi khi, sẽ ấn tượng hơn nếu in một liên hệ với hình ảnh của nó. Bài viết này sẽ giới thiệu một số cách giải quyết để thực hiện nó.
In lựa chọn email trong Outlook
Nếu bạn nhận được một email và nhận thấy rằng có một số nội dung email cần được in ra thay vì in toàn bộ email, bạn sẽ làm gì? Trên thực tế, Outlook có thể giúp bạn thực hiện thao tác này với sự trợ giúp của các trình duyệt internet, chẳng hạn như Firefox và Internet Explorer. Ở đây tôi sẽ lấy các trình duyệt Internet làm ví dụ. Hãy xem các hướng dẫn sau đây.
Công cụ năng suất văn phòng tốt nhất
Kutools cho Outlook - Hơn 100 tính năng mạnh mẽ để tăng cường Outlook của bạn
📧 Tự động hoá email: Vắng Mặt (Có sẵn cho POP và IMAP) / Lên lịch gửi email / Tự động CC/BCC theo quy định khi gửi Email / Tự động chuyển tiếp (Quy tắc nâng cao) / Tự động thêm lời chào / Tự động chia email nhiều người nhận thành các tin nhắn riêng lẻ hữu ích. Cảm ơn !
📨 Quản lý email: Dễ dàng thu hồi email / Chặn email lừa đảo theo chủ đề và những người khác / Xóa các email trùng lặp / Tìm Kiếm Nâng Cao / Hợp nhất các thư mục hữu ích. Cảm ơn !
📁 Tệp đính kèm chuyên nghiệp: Lưu hàng loạt / Tách hàng loạt / Nén hàng loạt / Tự động lưu / Tự động tách / Tự động nén hữu ích. Cảm ơn !
🌟 Giao diện ma thuật: 😊Thêm nhiều biểu tượng cảm xúc đẹp và thú vị hơn / Tăng năng suất Outlook của bạn với chế độ xem theo thẻ / Thu nhỏ Outlook thay vì đóng hữu ích. Cảm ơn !
👍 Kỳ quan chỉ bằng một cú nhấp chuột: Trả lời tất cả bằng tệp đính kèm đến / Email chống lừa đảo / 🕘Hiển thị múi giờ của người gửi hữu ích. Cảm ơn !
👩🏼🤝👩🏻 Danh bạ & Lịch: Thêm hàng loạt liên hệ từ các email đã chọn / Chia nhóm liên hệ thành các nhóm riêng lẻ / Xóa lời nhắc sinh nhật hữu ích. Cảm ơn !
Trên 100 tính năng Chờ đợi sự khám phá của bạn! Bấm vào đây để khám phá thêm.

